
Monday, January 05, 2009
One Piece Welt Pocket
I thought I'd start off the new year with a nifty little sewing tutorial. If you're a non-sewer, quit here or you'll almost certainly be bored to tears, but don't worry, because I'm sure I'll be back to food and other crafty stuff shortly :)
As you are probably aware, I sew... a lot. And I take a great deal of pride in producing and selling only things that are as perfect as I can make them, a fact that, when it comes to handsewn goods, can be at odds with needing to keep the whole endeavour worth my while financially. So I'm always looking for ways to work that are both better and faster, and this little trick is one of the handy shortcuts that I've come up with that I absolutely love.
I'm going to address welt pockets specifically, but this technique was actually born from a method I devised for zipper pockets whereby the zipper tape is covered even on the reverse side (tutorial coming soon I hope).
This is a one piece method, meaning you achieve a complete welt pocket using only a single piece of fabric insead of two pieces for the pocket bag plus two separate strips of fabric for the welting as with the standard method. The finished welt pocket looks like this:
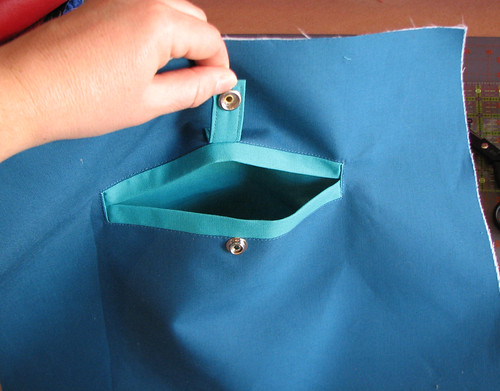
Looks complicated and time consuming, right? Not!
1. First, calculate and cut your pocket bag fabric. For the width figure the finished pocket opening size and add 2". For the length, double the desired pocket bag depth and add 4" to 6".
In my case, I want a finished opening that is 7" wide with a 1" wide welt, and I want my pocket to end up 8" deep, so I cut my bag fabric 9" wide by 22" long, or, (2x8)+6. If you're planning a narrower welt opening, your welts will use less fabric so you can cut the pocket fabric a bit shorter.

2. Locate and mark the top of the opening on right side of (fashion) fabric.
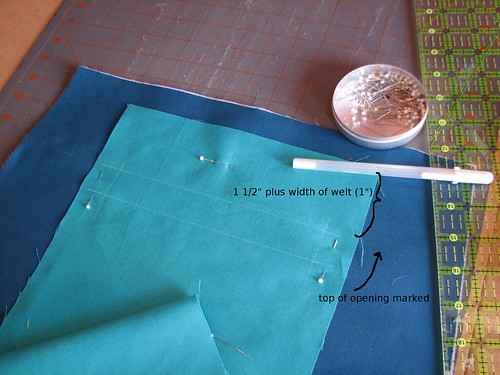
3. Lay the strip of pocket bag fabric out flat on top of the fashion fabric, right sides together*. Align the top of the pocket bag piece 1 1/2" plus the width of the welt from the top of edge of the welt opening. In this case, the top edge of the pocket extends 2 1/2" above the top edge of the intended opening.
4. Carefully mark stitching lines for the pocket opening on the pocket bag. The whole arrangement ready to stitch should look something like this:
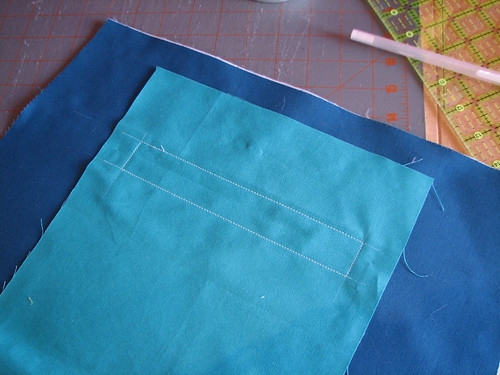
5. Stitch the pocket opening as accurately as possible using a short (2-2.5mm) stitch length.
6. Cut opening, being careful to center the cut and snipping in a "V" as close to opening corners as possible without cutting beyond stitching. An x-acto knife works well, and I like to put a drop of FrayCheck in each corner just for insurance.
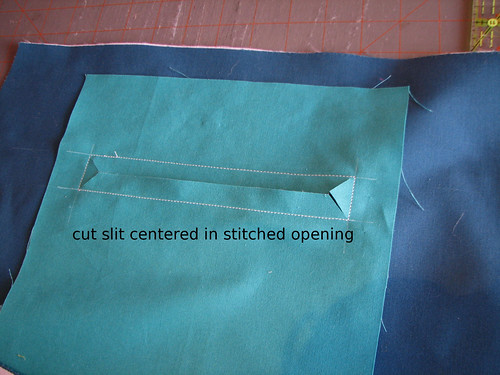
Now, here's where we deviate from a standard welt pocket. Normally you turn and press this opening. For a zipper pocket you'd have made the opening narrower and you'd put the zipper in now. For a welted pocket, you'd have inserted separate strips of folded fabric, with or without cording inside them, between these layers and then tried to line up and stitch the whole deal, a process that I've always found excessively futzy, messy and do-over prone. I have a better way...
7. Fold the pocket bag fabric back through the opening to the wrong side. Turn the whole piece over and press the pocket bag flat to the wrong side just at the vertical seams at this point, taking care to get the corners as neat and pucker-free as possible:
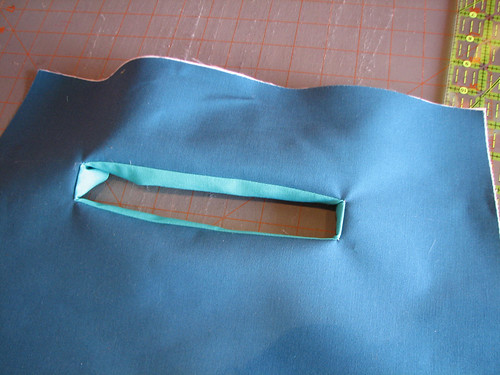
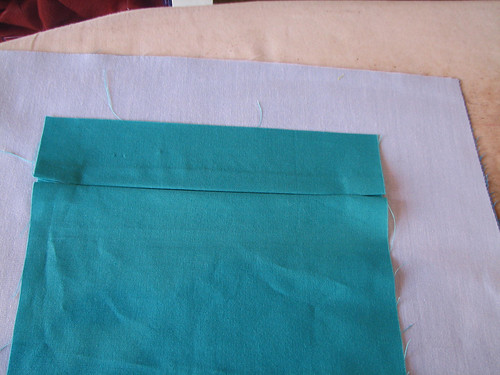
8. Press the top seam down, making a nice straight fold across entire width of pocket fabric, then turn up edge of pocket fabric along cut edge.
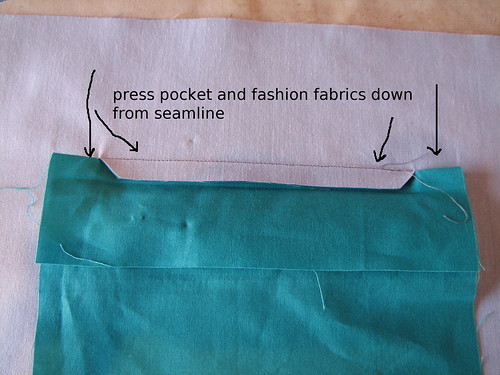
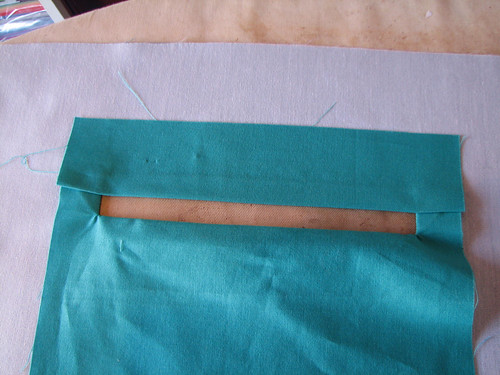
From the front, it should now look like this:
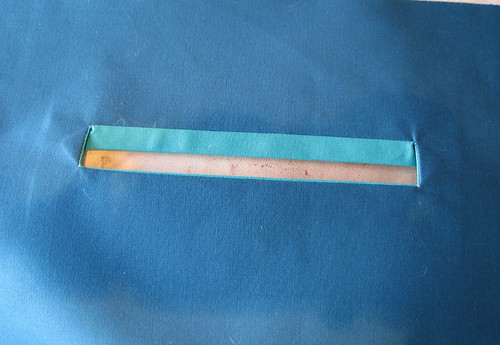
9. Repeat with lower edge.

Pin folds in place from front and topstitch around entire welt opening:
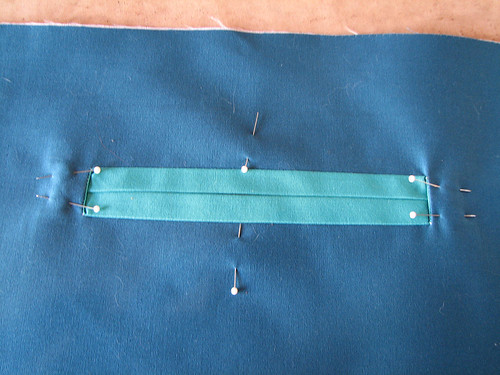
here's what it looks like now, from the right side:
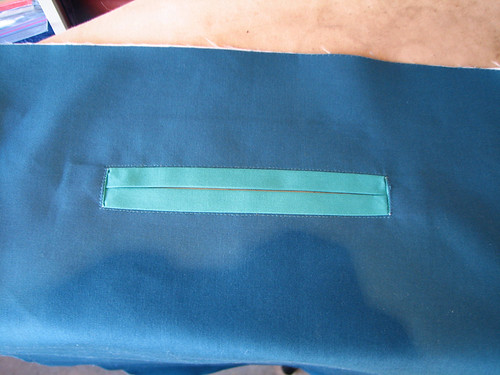
and from the inside (wrong) side:

At this point, I stitched on a snap tab for the closure, but you can omit this or use an alternative:
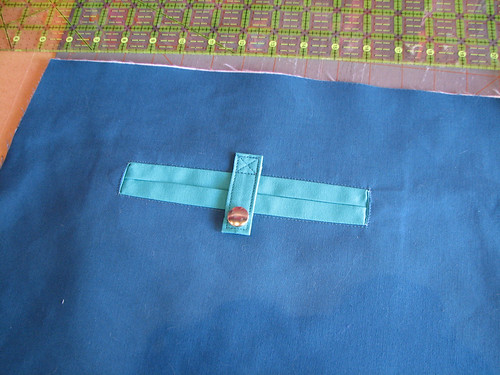
10. Now form the pocket bag. Fold bottom edge of pocket bag fabric up to meet the top edge. Pin edges and stitch around sides and top, folding fashion fabric back and away as necessary to keep from being caught in stitching. Finish raw edges of pocket bag as desired:

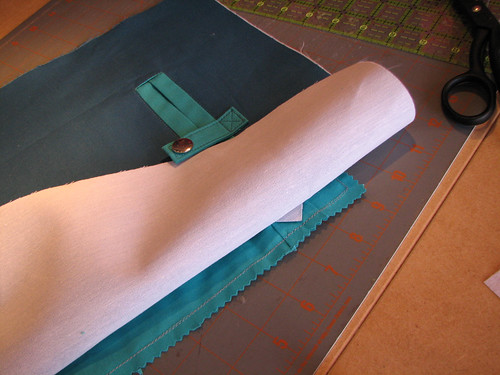
Press, and voila! A simple, neat and tidy one piece welted pocket!
Of course you can use matching rather than contrasting fabric for the pocket if you want a more subdued look. I like to use something contrasting because it shows off the detail of the welt better and adds a little pop and interest to the bag lining. Also keep in mind that if you want a true corded welt pocket this method still works. Just add it by cutting the cording strips the same length as the opening and placing them in the folds before you topstitch everything in place. I think it's a superior method since it's reduces the amount of fabric in the seams and produces a tider, less lumpy looking pocket.
* orienting the fabrics right sides together puts the right side of the pocket fabric on the pocket interior. In certain situations, you may want to change this.
As I said, I hope to have a tutorial for a one piece couture-finish zipper pocket up shortly, and I'll also show you how to do a French seamed pocket bag using this method for pockets that are visible inside a bag.
Oh yea, and Happy New Year!
As you are probably aware, I sew... a lot. And I take a great deal of pride in producing and selling only things that are as perfect as I can make them, a fact that, when it comes to handsewn goods, can be at odds with needing to keep the whole endeavour worth my while financially. So I'm always looking for ways to work that are both better and faster, and this little trick is one of the handy shortcuts that I've come up with that I absolutely love.
I'm going to address welt pockets specifically, but this technique was actually born from a method I devised for zipper pockets whereby the zipper tape is covered even on the reverse side (tutorial coming soon I hope).
This is a one piece method, meaning you achieve a complete welt pocket using only a single piece of fabric insead of two pieces for the pocket bag plus two separate strips of fabric for the welting as with the standard method. The finished welt pocket looks like this:
Looks complicated and time consuming, right? Not!
1. First, calculate and cut your pocket bag fabric. For the width figure the finished pocket opening size and add 2". For the length, double the desired pocket bag depth and add 4" to 6".
In my case, I want a finished opening that is 7" wide with a 1" wide welt, and I want my pocket to end up 8" deep, so I cut my bag fabric 9" wide by 22" long, or, (2x8)+6. If you're planning a narrower welt opening, your welts will use less fabric so you can cut the pocket fabric a bit shorter.
2. Locate and mark the top of the opening on right side of (fashion) fabric.
3. Lay the strip of pocket bag fabric out flat on top of the fashion fabric, right sides together*. Align the top of the pocket bag piece 1 1/2" plus the width of the welt from the top of edge of the welt opening. In this case, the top edge of the pocket extends 2 1/2" above the top edge of the intended opening.
4. Carefully mark stitching lines for the pocket opening on the pocket bag. The whole arrangement ready to stitch should look something like this:
5. Stitch the pocket opening as accurately as possible using a short (2-2.5mm) stitch length.
6. Cut opening, being careful to center the cut and snipping in a "V" as close to opening corners as possible without cutting beyond stitching. An x-acto knife works well, and I like to put a drop of FrayCheck in each corner just for insurance.
Now, here's where we deviate from a standard welt pocket. Normally you turn and press this opening. For a zipper pocket you'd have made the opening narrower and you'd put the zipper in now. For a welted pocket, you'd have inserted separate strips of folded fabric, with or without cording inside them, between these layers and then tried to line up and stitch the whole deal, a process that I've always found excessively futzy, messy and do-over prone. I have a better way...
7. Fold the pocket bag fabric back through the opening to the wrong side. Turn the whole piece over and press the pocket bag flat to the wrong side just at the vertical seams at this point, taking care to get the corners as neat and pucker-free as possible:
8. Press the top seam down, making a nice straight fold across entire width of pocket fabric, then turn up edge of pocket fabric along cut edge.
From the front, it should now look like this:
9. Repeat with lower edge.
Pin folds in place from front and topstitch around entire welt opening:
here's what it looks like now, from the right side:
and from the inside (wrong) side:
At this point, I stitched on a snap tab for the closure, but you can omit this or use an alternative:
10. Now form the pocket bag. Fold bottom edge of pocket bag fabric up to meet the top edge. Pin edges and stitch around sides and top, folding fashion fabric back and away as necessary to keep from being caught in stitching. Finish raw edges of pocket bag as desired:
Press, and voila! A simple, neat and tidy one piece welted pocket!
Of course you can use matching rather than contrasting fabric for the pocket if you want a more subdued look. I like to use something contrasting because it shows off the detail of the welt better and adds a little pop and interest to the bag lining. Also keep in mind that if you want a true corded welt pocket this method still works. Just add it by cutting the cording strips the same length as the opening and placing them in the folds before you topstitch everything in place. I think it's a superior method since it's reduces the amount of fabric in the seams and produces a tider, less lumpy looking pocket.
* orienting the fabrics right sides together puts the right side of the pocket fabric on the pocket interior. In certain situations, you may want to change this.
As I said, I hope to have a tutorial for a one piece couture-finish zipper pocket up shortly, and I'll also show you how to do a French seamed pocket bag using this method for pockets that are visible inside a bag.
Oh yea, and Happy New Year!


Tuesday, February 17, 2009
Who Needs A Doggie Bag?
No, not that kind. I don't do foil swans.
You know...there are days when I wander up to my studio with absolutely zero idea of what I'm going to work on and then all of the sudden I'll look at the clock and realize I've been in the craft zombie zone for four hours.
And believe it or not, there are days when something cute actually comes of all that.
Anyway, I meant this kind of doggie bag:

This is a pumped up version of one of my old favorites, the Flap Bag that can be worn across the body or around the waist. Chocolate brown leather with a 2" gusset and a separate welt pocket on the back. And doggies. Don't forget about the doggies:


You know...there are days when I wander up to my studio with absolutely zero idea of what I'm going to work on and then all of the sudden I'll look at the clock and realize I've been in the craft zombie zone for four hours.
And believe it or not, there are days when something cute actually comes of all that.
Anyway, I meant this kind of doggie bag:
This is a pumped up version of one of my old favorites, the Flap Bag that can be worn across the body or around the waist. Chocolate brown leather with a 2" gusset and a separate welt pocket on the back. And doggies. Don't forget about the doggies:
Labels: sewing crafting leather handbag
Saturday, June 13, 2009
"Please Use the Victoria Beckham Lens"
Whew! It's been a crazy couple of weeks!
Firstly, a progress report on the wood-fired pizza oven project over at Modern in MN. The insulation materials I was waiting for arrived this week, so I'm on to the dome-building portion of the event which should be interesting. I'm hoping to get a start on it next week.
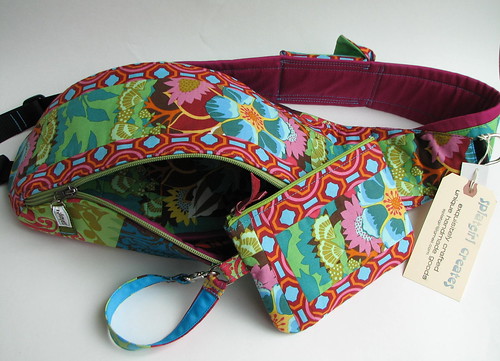
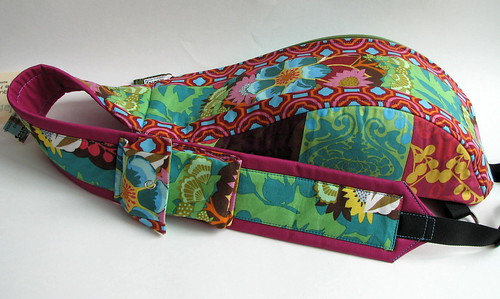
Then, a couple of gorgeous custom bags that have left the building bound for their new owners. I'm telling you, sometimes it seriously pains me to actually have to let go and sell this stuff! One of my absolute favorites was this sling backpack for Misti in Austin that came out so incredibily delicious looking that I wanted to lick it:
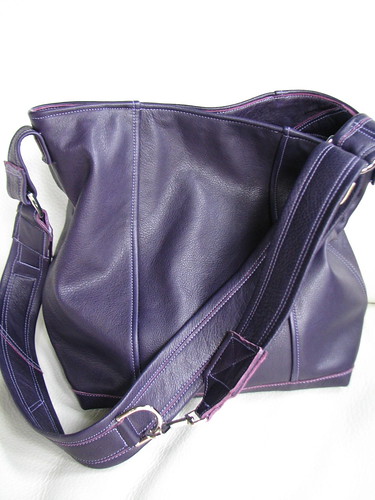
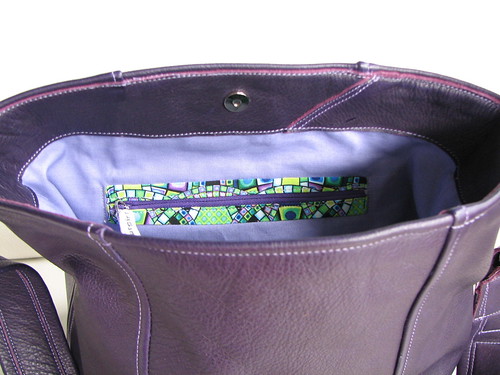
And this bucket bag commissioned by a local gal in buttery soft purple leather. What with it being ALL ONE COLOR and all, I wasn't super excited because you know how I am about my colors, but it turned out beautifully and the finished product really suckered me because it was so attractively slouchy and yummy feeling:

she picked a fun purple and green print for interior accent, and I couldn't resist using it in a modified version (with zipper) of my quick welt pocket:
And then, most crazy of all, I finally got to hook up with Marike, a journalist from Germany who first contacted me way last summer about coming here to do an article on me and the house. I was and still am certain I'm not all that interesting, but I immediately said yes because I thought at the very least it would be a fun experience. So we finally got to meet in person this week after several months of email exchanges, and she came with Claudia, a German photographer who is based in New York. We spent the day here at the house chatting and taking photos....and eating, of course. I made them my world famous chocolate chip cookies because I suspected it would be something they hadn't had before. That turned out to be a winning bet, and they both said cookies of any sort are not a big thing in Germany. I guess they are all about the cakes. Who knew.
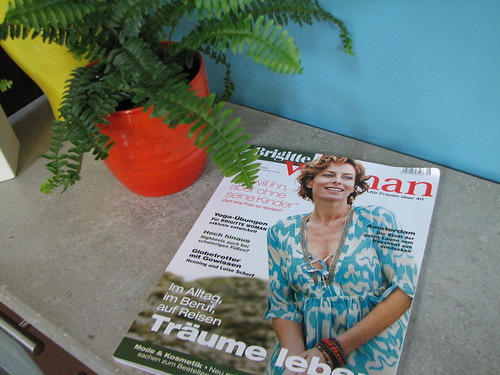
Marike brought me the current issue of Brigitte Woman which is the magazine she's doing the article for, and she said her piece on me will run in one of the fall issues. Any German speakers wanna sign up to come here and read it to me when it comes out?
Anwyay, I had set my camera out specifically so that I would remember to take some pictures of them, but I forgot. So UBER BOO! I guess I was a little preoccupied...have I mentioned I HATE having my picture taken? And there's nothing like knowing every nook and crannie of your house is going to be photographed to put the fear of the cobwebs and dust bunnies in a girl...
Firstly, a progress report on the wood-fired pizza oven project over at Modern in MN. The insulation materials I was waiting for arrived this week, so I'm on to the dome-building portion of the event which should be interesting. I'm hoping to get a start on it next week.
Then, a couple of gorgeous custom bags that have left the building bound for their new owners. I'm telling you, sometimes it seriously pains me to actually have to let go and sell this stuff! One of my absolute favorites was this sling backpack for Misti in Austin that came out so incredibily delicious looking that I wanted to lick it:
And this bucket bag commissioned by a local gal in buttery soft purple leather. What with it being ALL ONE COLOR and all, I wasn't super excited because you know how I am about my colors, but it turned out beautifully and the finished product really suckered me because it was so attractively slouchy and yummy feeling:
she picked a fun purple and green print for interior accent, and I couldn't resist using it in a modified version (with zipper) of my quick welt pocket:
And then, most crazy of all, I finally got to hook up with Marike, a journalist from Germany who first contacted me way last summer about coming here to do an article on me and the house. I was and still am certain I'm not all that interesting, but I immediately said yes because I thought at the very least it would be a fun experience. So we finally got to meet in person this week after several months of email exchanges, and she came with Claudia, a German photographer who is based in New York. We spent the day here at the house chatting and taking photos....and eating, of course. I made them my world famous chocolate chip cookies because I suspected it would be something they hadn't had before. That turned out to be a winning bet, and they both said cookies of any sort are not a big thing in Germany. I guess they are all about the cakes. Who knew.
Marike brought me the current issue of Brigitte Woman which is the magazine she's doing the article for, and she said her piece on me will run in one of the fall issues. Any German speakers wanna sign up to come here and read it to me when it comes out?
Anwyay, I had set my camera out specifically so that I would remember to take some pictures of them, but I forgot. So UBER BOO! I guess I was a little preoccupied...have I mentioned I HATE having my picture taken? And there's nothing like knowing every nook and crannie of your house is going to be photographed to put the fear of the cobwebs and dust bunnies in a girl...