
Tuesday, April 27, 2010
I've Been Published!
Yikes, Spring. It seems like I got zero warning before life reverted back to the overscheduled insanity that is the warm weather months.
Good news: the garden situation is now top notch! Huge thanks to my garden angel Linda for the lend of a super nice tiller, a boat load of composted horse manure from her farm, and some very sage gardening advice. Also for the "Egyptian onions", which, after a quick peek at the internets, are aka "walking onions". A perennial onion, who knew? More on that later for sure.
Anyway, one of the exciting events that you may have gotten a sneak peek about if you follow me on Twitter or Flickr is my authorial debut:

Needless to say, I'm ridiculously excited about this. My first published piece! What you see above is by moi... I'm a contributor in this seasons' Taunton's Sew Stylish magazine! On news stands now, it's the Spring 2010 issue and it's absolutely LOADED with fantastic projects and tips to add to your sewing repertoire. Do go pick up a copy, won't you?
Good news: the garden situation is now top notch! Huge thanks to my garden angel Linda for the lend of a super nice tiller, a boat load of composted horse manure from her farm, and some very sage gardening advice. Also for the "Egyptian onions", which, after a quick peek at the internets, are aka "walking onions". A perennial onion, who knew? More on that later for sure.
Anyway, one of the exciting events that you may have gotten a sneak peek about if you follow me on Twitter or Flickr is my authorial debut:
Needless to say, I'm ridiculously excited about this. My first published piece! What you see above is by moi... I'm a contributor in this seasons' Taunton's Sew Stylish magazine! On news stands now, it's the Spring 2010 issue and it's absolutely LOADED with fantastic projects and tips to add to your sewing repertoire. Do go pick up a copy, won't you?
Sunday, April 11, 2010
There Has Been Gardening
Or pre-gardening. The hot, sweaty, dirty hard work part of the gardening deal, that is.
....wait...
That's ALL the parts of the gardening deal, isn't it?
Somehow I always manage to forget that.
We tilled. Or rather the Boy part of we tilled.
We hauled and cut and bolted.
We dug. Or mostly, the Boy part of we dug.
We cursed. Our hard, heavy clay soil, yikes.
That Boy, he is SUCH a trooper. This is probably weekend #674 that I have roped him into hard labor for one of MY projects, and he has never complained or gotten cranky or impatient. It's one of the 674,000 reasons why I adore him.
Anyway, voila! We have garden beds!
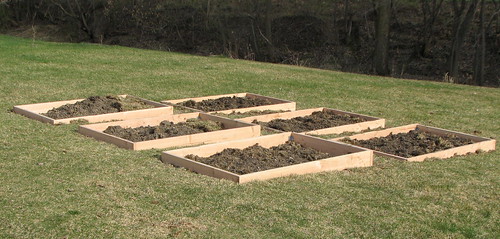
That weekends' worth of effort is six 4'x 6' semi-raised beds. I think the worst part is done, but I'm sure I'm kidding myself, because there is a LOT more digging and soil prep left to do. I'm guessing at least a couple of loads of compost and some other stinky good stuff plus lots more tossing and turning and churning and I should be all set to start feeding the wildlife.
Because what you don't see is the fence part of the show, and that's because I'm still on the fence about the fence. What to use for posts? I wanted big, 3" diameter bamboo poles but they are proving a pain in the butt and expensive to get here so I might have to settle for plain old wood posts. And do I need to dig the fencing material down into the dirt a ways to keep out the little critters? Is 4' tall enough to keep the deer out?
Do I really have to dig more holes? It seems like the defining event of summers around here ever since we arrived has been digging holes in dirt that doesn't want to be dug. Ugh.
....wait...
That's ALL the parts of the gardening deal, isn't it?
Somehow I always manage to forget that.
We tilled. Or rather the Boy part of we tilled.
We hauled and cut and bolted.
We dug. Or mostly, the Boy part of we dug.
We cursed. Our hard, heavy clay soil, yikes.
That Boy, he is SUCH a trooper. This is probably weekend #674 that I have roped him into hard labor for one of MY projects, and he has never complained or gotten cranky or impatient. It's one of the 674,000 reasons why I adore him.
Anyway, voila! We have garden beds!
That weekends' worth of effort is six 4'x 6' semi-raised beds. I think the worst part is done, but I'm sure I'm kidding myself, because there is a LOT more digging and soil prep left to do. I'm guessing at least a couple of loads of compost and some other stinky good stuff plus lots more tossing and turning and churning and I should be all set to start feeding the wildlife.
Because what you don't see is the fence part of the show, and that's because I'm still on the fence about the fence. What to use for posts? I wanted big, 3" diameter bamboo poles but they are proving a pain in the butt and expensive to get here so I might have to settle for plain old wood posts. And do I need to dig the fencing material down into the dirt a ways to keep out the little critters? Is 4' tall enough to keep the deer out?
Do I really have to dig more holes? It seems like the defining event of summers around here ever since we arrived has been digging holes in dirt that doesn't want to be dug. Ugh.
Friday, April 02, 2010
Yogurt Baby Report Card
Last time I spoke of and showed you the towel-swaddled lump that was my first batch of homemade yogurt, and I figured I had better get back here with a follow-up to that project so you didn't think I was overtaken by rampant lactobacillus or something.
While Y.B. was incubating in the heating pad and towel swaddling, I was experimenting with my oven on proof setting as a possible alternative environment since my heating pad wouldn't work on low like I wanted it to. On my oven at least, all pushing the "proof" button really does is turn on the light (meaning every oven technically has some version of a "proof" setting), and that turns out to be just about exactly right for yogurt incubation. Ideal is 90-110F, and mine was running right around 100F, so I ended up abandoning the heating pad and putting the jars in the oven instead. SO much easier than trying to regulate the temperature with my flaky heating pad and a bunch of towels.
Whew. Anyway, it totally worked!! Delicious, yummy homemade yogurt!

That's my typical breakfast, with a very exciting dose of freshly made olive oil/apricot/coconut granola--another one of my homemade obsession foods.
I have to be honest and say that the whole reason I wanted to start doing this whole yogurt making thing is laziness, not quality or taste or anything fun like that. It was just getting to be too much work to track down organic yogurt from a non-corporately owned label every time I needed to get a re-up (I eat plain yogurt almost every day). So it's not that homemade is necessarily any better or different than what you can buy--although it is free from stabilizers and other weirdness that some brands use. It is MUCH less expensive, however. I just checked now and I was paying $4.69 for a quart of Stonyfield (corporately owned) plain organic yogurt vs. $3.99 for a half gallon of organic 1% milk from a co-op dairy label. So that means homemade yogurt works out to be $2 a quart, or less than half the price of prepackaged. Yowza. That's a pretty decent savings for 10 minutes of effort and a an overnights' worth of lightbulb use.
If you want to try this, there are lots of methods and recipes online. There's just four very basic steps and no special equipment is required other than a thermometer.
heating the milk to 185F
cooling the milk to 110F
innoculating the milk with a spoonful of yogurt
incubating
It needs to incubate for several hours or overnight, but the actual prep time is just a few minutes. I used the double boiler method for heating the milk but next time I don't think I'll bother. And as I said, I eat plain yogurt so I left mine as is. If you want to add sweetener or fruit or something you can do that either before or after incubation. I said there's not much difference between homemade and storebought plain, but I can imagine adding homemade preserves or fresh or frozen fruit would be a huge improvement in taste vs. the flavored/sweetened supermarket varieties.
While Y.B. was incubating in the heating pad and towel swaddling, I was experimenting with my oven on proof setting as a possible alternative environment since my heating pad wouldn't work on low like I wanted it to. On my oven at least, all pushing the "proof" button really does is turn on the light (meaning every oven technically has some version of a "proof" setting), and that turns out to be just about exactly right for yogurt incubation. Ideal is 90-110F, and mine was running right around 100F, so I ended up abandoning the heating pad and putting the jars in the oven instead. SO much easier than trying to regulate the temperature with my flaky heating pad and a bunch of towels.
Whew. Anyway, it totally worked!! Delicious, yummy homemade yogurt!
That's my typical breakfast, with a very exciting dose of freshly made olive oil/apricot/coconut granola--another one of my homemade obsession foods.
I have to be honest and say that the whole reason I wanted to start doing this whole yogurt making thing is laziness, not quality or taste or anything fun like that. It was just getting to be too much work to track down organic yogurt from a non-corporately owned label every time I needed to get a re-up (I eat plain yogurt almost every day). So it's not that homemade is necessarily any better or different than what you can buy--although it is free from stabilizers and other weirdness that some brands use. It is MUCH less expensive, however. I just checked now and I was paying $4.69 for a quart of Stonyfield (corporately owned) plain organic yogurt vs. $3.99 for a half gallon of organic 1% milk from a co-op dairy label. So that means homemade yogurt works out to be $2 a quart, or less than half the price of prepackaged. Yowza. That's a pretty decent savings for 10 minutes of effort and a an overnights' worth of lightbulb use.
If you want to try this, there are lots of methods and recipes online. There's just four very basic steps and no special equipment is required other than a thermometer.
heating the milk to 185F
cooling the milk to 110F
innoculating the milk with a spoonful of yogurt
incubating
It needs to incubate for several hours or overnight, but the actual prep time is just a few minutes. I used the double boiler method for heating the milk but next time I don't think I'll bother. And as I said, I eat plain yogurt so I left mine as is. If you want to add sweetener or fruit or something you can do that either before or after incubation. I said there's not much difference between homemade and storebought plain, but I can imagine adding homemade preserves or fresh or frozen fruit would be a huge improvement in taste vs. the flavored/sweetened supermarket varieties.
Labels: cooking food yogurt
![]()