
Thursday, February 26, 2009
Return of Squishee
Herrow friends! Dis is da Mast-o-Dog speakin to tells you dat my mommie fwinally got around to da restuffin of ma bed. I am wreel happy abowt dis on acoutnta dat my old bed was knot squishee at all anymore, wich my mommie sez is becuz dat was wonna dem el cheepo beds fwom cause co. So herbs twook out all dat fwattened stuffin and put in dis stuff she cawls shwedded memery fowam, froms da upowlstery swupply. An lemme tells yoo, it is fwantabulously cwomfortable, sos dad I doo not entend to git up at awl tooday. I ams just gonna sweep and reewax on dis new bed foreber!

and as if dat was knot enuf, herbs eben restuffind ma up stares bed, too! isn't dat just da bwestest thing eber? twoo squishified noo beds!
pee.ess. it is snowen awot here, sos dat it is now compweetwe white out dere, wich makes da entended pwan to sweep and reewax all day eben more pwerfekt!
and as if dat was knot enuf, herbs eben restuffind ma up stares bed, too! isn't dat just da bwestest thing eber? twoo squishified noo beds!
pee.ess. it is snowen awot here, sos dat it is now compweetwe white out dere, wich makes da entended pwan to sweep and reewax all day eben more pwerfekt!
Labels: greyhound dog
Wednesday, February 25, 2009
Sharpening Up

Got knives?
I'm ashamed to admit that I have a whole drawer full. Many, many more than one would actually need, which, considering my impatience for clutter and non-used stuff, makes me something of a hypocrite in the knife department.
So here's my confession and the reason why the state of things in my knife drawer is what it is: For a long time, when I would start to find the knives in my drawer lacking in the sharpness department, I would just go and buy a new one. Because dull knives (and cheap knives, for that matter) drive me CRAZY, and they're dangerous. (As a side note, I think that a lot of the reason some people don't like to cook or think it's too much work is related to ghetto or dull knives.)
Now, don't get me wrong...I'm fully capable of showing my knives the steel that's parked next to them in the drawer, but the fact is that a sharpening steel is for honing a blade, and after a while, a knife blade needs more than that to get it back to perfectly razor sharp and able to hold an edge.
And I knew this, and a lot of my knives were definitely at this point. And for years and years, I have been saying and intending to take my collection in to be professionally sharpened, meaning ground and re-edged, so that they would be back at a point where a few passes over the steel makes the blade as good and sharp as new.
But I just never made it happen.
And then recently, finding room for not a single new knife in my drawer, and therefore not a single truly sharp knife amongst my collection, I decided I needed to take matters into my own hands once and for all.
So I took a deep breath and decided to buy a sharpening stone and learn how to re-edge a knife on my own.
And after a bunch of looking around and reading up, I decided to stick to the basics, and bought a simple, two sided stone from this place, because they were inexpensive and basic, and what I came to realize is that sharpening a knife is truly a basic thing once you get to know the general gist of it. Among other places, there is some awesome DIY info here. I found the pictorial thing at the bottom particuarly helpful.
I don't think I'm a pro at it yet, but now that I've had a chance to give it a go, the little bit of money and time I've invested in learning and practicing with my new stone has paid off with a collection of knives that's in a much better state than it used to be. And trust me...I know it's one of those things that seems like a dark art and that it's tempting to think you need one of those expensive set ups to get it right, but you really, really don't. Even with the simplest of equipment, it's a skill I think you'll have well in hand with just a little practice, and it's one of those things I wish I would have learned and embraced YEARS ago.
So, if you're like me and have some knives that are making your cooking adventures less than enjoyable, get going and get yourself knowed-up on sharpening how-to beyond just using a steel. You'll be SO glad you did!
Sunday, February 22, 2009
Of Boy and Cake
Excerpt from one of todays' conversations with Boy:
Boy: "I once rented a movie just because I knew (via sondb.com. yes really.) that Linda Hamilton appeared naked in it.
me: "Linda Hamilton? Was she hot? Because I always sort of thought she was homely"
Boy: "yea, but she had great hair"
me: "yea, I had great hair in the 80's, too"
Boy: "I know."
me: "How do you know, you didn't know me in the 80's?"
Boy: "I've seen pictures."
me: "Ah. So do you secretly pine away for me to go back to my 80's hair?"
Boy: "Hell no. I can't handle you now. I can't imagine what it would have been like trying to handle you back then."
me: "dude. I'm so blogging that."
And then. What captured my first thought upon waking up this morning, pestered the back of my mind the whole day, and caused me to make us eat a salad dinner at the very senior citizen-like hour of 5pm, just so I could get to it sooner?
Coconut Layer Cake:
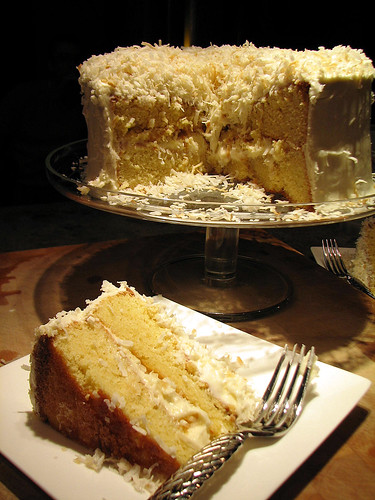
OMFD. This is the cake to beat all cakes, unless you hate coconut. But seriously, even if you are one of those people, this cake is so good it might convert you. It's really, insanely delicious, and I am the worst of the worst when it comes to being a dessert and cake snob so I feel like that is really saying something.
I used to think the coconut cake they have at YUM!, with the seven minute icing was the greatest thing ever, particularly because it has custard between the layers, but this one, ahem....takes the cake...by a mile.
I do have a couple of gripes with the recipe, namely that mine sunk in the middle and the cream cheese icing turns out too runny if you make it as written, but with a couple of tiny tweaks, this is now most assuredly the greatest cake recipe in my collection. Like forever. Really.
It's dense and moist and rich with just the right amount contrast via the cream cheese frosting, and it seems to just be getting better after a couple of days in the fridge.
It's cake nirvana.
So the sinking thing, according to the goddess of cake baking, Rose Levy Beranbaum (who has a blog...who knew!), is due to too much baking powder or too big a pan, so despite the fact that I followed the recipe exactly, I think I will take the advice of the reviewers and make 3-8" layers instead of 2-9" next time. Or reduce the baking powder a bit as she suggests. And the icing thing is an easy fix. It calls for 1/2c. of Coco Lopez which is convenient because then between the cake and the frosting you end up using up the whole can, but it's just too much liquid. So you can either scale that back to just a couple of tablespoons (or none, and use coconut extract instead) or increase the powdered sugar by a cup or so, or both.
Anyway, that's why mine looks a little gloppy and unevenly frosted, plus the fact that it was still a bit warm in this photo. But I'm telling you, the end product is so freakin tasty that I can overlook those deficits and wholeheartedly endorse this recipe. It's one you absolutely MUST make. Plus it's sort of gorgeous in all it's shaggy messiness, no?
I did tweak just a bit by lightly toasting the coconut (because not toasting coconut is like not toasting nuts: a failure to capitalize on a major flavor and texture improving opportunity) and adding a 1/4tsp. or so of coconut extract to both the cake batter and the icing, but that's it. With these plus the tweaks I've mentioned above, I know this is going to be my stand-by favorite cake recipe for probably the rest of, like, ever.
So I'm going to go on record here and now and announce that this is the cake I want for every birthday that I am fortunate enough to get to have from now on.
Now, if only I can train Boy to make it, I'll be all set.
Boy: "I once rented a movie just because I knew (via sondb.com. yes really.) that Linda Hamilton appeared naked in it.
me: "Linda Hamilton? Was she hot? Because I always sort of thought she was homely"
Boy: "yea, but she had great hair"
me: "yea, I had great hair in the 80's, too"
Boy: "I know."
me: "How do you know, you didn't know me in the 80's?"
Boy: "I've seen pictures."
me: "Ah. So do you secretly pine away for me to go back to my 80's hair?"
Boy: "Hell no. I can't handle you now. I can't imagine what it would have been like trying to handle you back then."
me: "dude. I'm so blogging that."
And then. What captured my first thought upon waking up this morning, pestered the back of my mind the whole day, and caused me to make us eat a salad dinner at the very senior citizen-like hour of 5pm, just so I could get to it sooner?
Coconut Layer Cake:
OMFD. This is the cake to beat all cakes, unless you hate coconut. But seriously, even if you are one of those people, this cake is so good it might convert you. It's really, insanely delicious, and I am the worst of the worst when it comes to being a dessert and cake snob so I feel like that is really saying something.
I used to think the coconut cake they have at YUM!, with the seven minute icing was the greatest thing ever, particularly because it has custard between the layers, but this one, ahem....takes the cake...by a mile.
I do have a couple of gripes with the recipe, namely that mine sunk in the middle and the cream cheese icing turns out too runny if you make it as written, but with a couple of tiny tweaks, this is now most assuredly the greatest cake recipe in my collection. Like forever. Really.
It's dense and moist and rich with just the right amount contrast via the cream cheese frosting, and it seems to just be getting better after a couple of days in the fridge.
It's cake nirvana.
So the sinking thing, according to the goddess of cake baking, Rose Levy Beranbaum (who has a blog...who knew!), is due to too much baking powder or too big a pan, so despite the fact that I followed the recipe exactly, I think I will take the advice of the reviewers and make 3-8" layers instead of 2-9" next time. Or reduce the baking powder a bit as she suggests. And the icing thing is an easy fix. It calls for 1/2c. of Coco Lopez which is convenient because then between the cake and the frosting you end up using up the whole can, but it's just too much liquid. So you can either scale that back to just a couple of tablespoons (or none, and use coconut extract instead) or increase the powdered sugar by a cup or so, or both.
Anyway, that's why mine looks a little gloppy and unevenly frosted, plus the fact that it was still a bit warm in this photo. But I'm telling you, the end product is so freakin tasty that I can overlook those deficits and wholeheartedly endorse this recipe. It's one you absolutely MUST make. Plus it's sort of gorgeous in all it's shaggy messiness, no?
I did tweak just a bit by lightly toasting the coconut (because not toasting coconut is like not toasting nuts: a failure to capitalize on a major flavor and texture improving opportunity) and adding a 1/4tsp. or so of coconut extract to both the cake batter and the icing, but that's it. With these plus the tweaks I've mentioned above, I know this is going to be my stand-by favorite cake recipe for probably the rest of, like, ever.
So I'm going to go on record here and now and announce that this is the cake I want for every birthday that I am fortunate enough to get to have from now on.
Now, if only I can train Boy to make it, I'll be all set.
Labels: cooking food coconut layer cake baking
Wednesday, February 18, 2009
Channeling My Inner Miami
All hail, the Cubano:
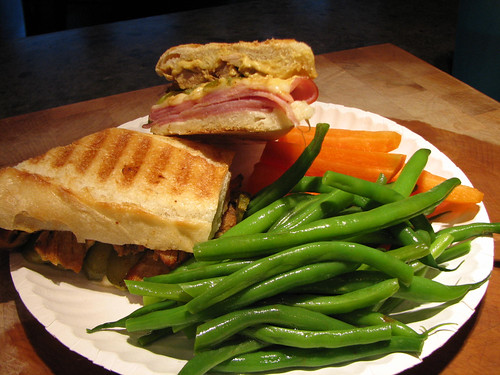
This one was enjoyed as tonights dinner, along with some steamed chilled green beans and carrot sticks. On paper plates, because we're talking street food here.
Did you know this sandwich is unique to south Florida? I didn't, until about half a minute ago.
If you've never had the pleasure of a Cubano, aka a Cuban sandwich, and you can't run right down to Miami and get one, I'll help you out.
It's a simple combo of ham and roast pork with swiss cheese, dill pickles and mustard. That's it other than the bread, which, just like great sandwiches the world over, is the defining characteristic. According to a quick online knowin-up, there's no such thing as Cuban bread outside Miami, but I promise you'll do just fine with a good puffy Italian or French loaf. I used baguette which is really a little too crusty, but hey, it's what I had on hand.
So it sounds easy, and almost a little boring right? But believe this white girl from the 'burbs when she tells you that it's one of those combinations of ingredients that sings and once you have an authentic Cubano, it'll be one of those flavor memories that sticks with you for life. Good, simple street food has a way of doing that, doesn't it?
In lieu of roast pork shoulder or some other more flavorful but huge cut that I was not prepared to address on this particular day, I did a quick braise with some boneless loin chops in beer plus cumin, coriander, a bit of chilli powder, salt, pepper and oregano. I tossed the still partially frozen chops into a pan with the rest of this stuff and just let it simmer with a cover on for three hours, until I could break the meat up easily with a fork. After that, I reduced the liquid and gave everything a good final toss before piling it on the sandwiches with the rest of the ingredients.
If you can, use a good honey roasted or glazed sliced ham, because with the acid of the pickles and mustard, the sandwich definitely benefits from sweeter ham.
I cooked mine on the pannini press, but an authentic Cubano is flat, pressed and cooked on a flat griddle, or plancha. You could replicate either of these methods with a cast iron skillet and a second pan on top of the sandwich to press it down. The flatter and more mushed together the ingredients, the better. Some recipes I looked at say to brush the outside of the bread with butter before griddling. I don't see how that could be bad.
Most importantly you have to cut it on the diagonal, or it just won't taste right.
So go cook yourself up a taste of Miami. It's a variation on the regular old ham and cheese that I think you'll come to love!
Labels: cooking food sandwich cubano
Tuesday, February 17, 2009
Who Needs A Doggie Bag?
No, not that kind. I don't do foil swans.
You know...there are days when I wander up to my studio with absolutely zero idea of what I'm going to work on and then all of the sudden I'll look at the clock and realize I've been in the craft zombie zone for four hours.
And believe it or not, there are days when something cute actually comes of all that.
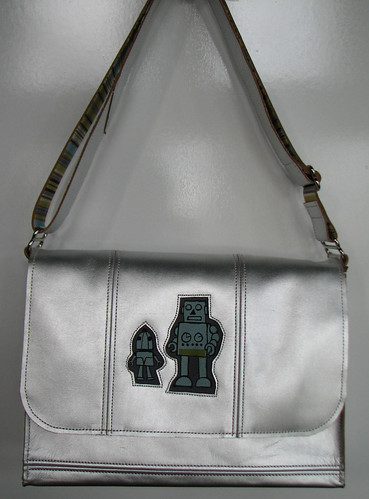
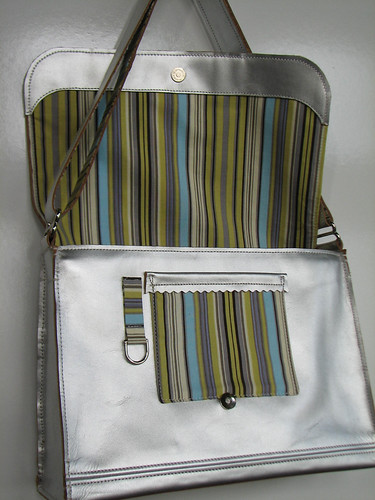
Anyway, I meant this kind of doggie bag:

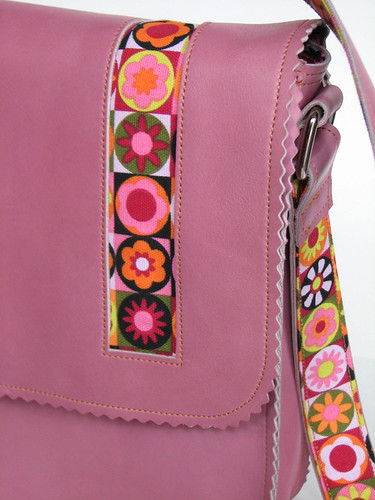
This is a pumped up version of one of my old favorites, the Flap Bag that can be worn across the body or around the waist. Chocolate brown leather with a 2" gusset and a separate welt pocket on the back. And doggies. Don't forget about the doggies:


You know...there are days when I wander up to my studio with absolutely zero idea of what I'm going to work on and then all of the sudden I'll look at the clock and realize I've been in the craft zombie zone for four hours.
And believe it or not, there are days when something cute actually comes of all that.
Anyway, I meant this kind of doggie bag:
This is a pumped up version of one of my old favorites, the Flap Bag that can be worn across the body or around the waist. Chocolate brown leather with a 2" gusset and a separate welt pocket on the back. And doggies. Don't forget about the doggies:
Labels: sewing crafting leather handbag
Monday, February 16, 2009
More Robotic Craftiness
The eye candy...er...eye cookie?... from Saturday's post reminded me that I have been intending to do a royal icing cookie tutorial for ages. And I sort of recalled having taken a bunch of in-progress photos on that subject long, long ago, but when I finally tracked those images down, it turns out they all sort of suck. Which would explain why I never got around to writing up the tutorial. So I'm going to revisit that project for the sole purpose of showing you just how it's done, because it's a fun and easy edible craft that's SO not as hard as it looks. Besides, I didn't get to eat enough of the Valentine batch which means I still have a craving for them, so yea, it's partly about indulging my sugar addiciton, too. I can promise you that the finished cookies are a surefire way to impress anyone who loves a good cookie and they make excellent gifts or party favors, so stay tuned for the full how-to coming soon.
Anyway.
Here's the fruits of todays' (and Fridays) labor:

find it in my Etsy shop just as soon as I can get some better pics.
Hope everyone survived their Monday!
Anyway.
Here's the fruits of todays' (and Fridays) labor:
find it in my Etsy shop just as soon as I can get some better pics.
Hope everyone survived their Monday!
Labels: handbag sewing leather robot
Saturday, February 14, 2009
Sweet!

Friday, February 13, 2009
Thinking Pink
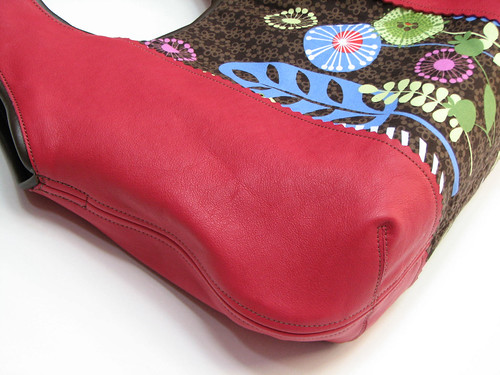
A little pre-Valentines day hit of tasty colorful cuteness:
I think I'll call this one Pinky...
Get it?
I'm capital O obsessed with the whole idea of fabric insets in leather, so rest assured there will be more to come along these lines. I've got another super duper cute one on the worktable now that I just can't wait to show you!

I think I'll call this one Pinky...
Get it?
I'm capital O obsessed with the whole idea of fabric insets in leather, so rest assured there will be more to come along these lines. I've got another super duper cute one on the worktable now that I just can't wait to show you!
Labels: sewing fabric leather craft handbag handmade
Tuesday, February 10, 2009
More Food Geekery re: McGriddle Crack
Thanks so much to all of you who left comments and suggestions about the great syrup glob Crack at home dilemma! What fun!
So yea, to those of you who wondered....YES!, they're really that good, and YES!, it really is all about the syrup globs being IN the pancakes, and the here-and-there kind of blips of sweet on the tongue that makes Crack what it is, at least for me. So no, just putting syrup in some form on the pancakes doesn't cut it.
And besides, where's the fun in making something easy? :)
I'm definitely going to try the maple sugar bits, and as far as using actual maple syrup goesI've researched all your suggestions for what kind of thickener to use. As I mentioned before, being able to stay a gel when heated is the issue, and it looks like agar-agar might be the best bet...from the website cybercolloids.net:
One of the single biggest users of agar in the west is in the baking industry where the very high melting points of the agar gels make them particularly suitable to the baking process. Agar has good compatibility with sugar and can be used in very high sugar environments that would precipitate most other gums.
I also read that it's used extensively in Asia which leads me to think I may be able to buy it at the Asian market, so I'm adding it to the list for my next United Noodles run.
I should also note that in addition to the method of getting the syrup globs into the pancakes that told you about in the original post, I did in fact, try "scattering" them on top of the already cooking pancakes, and even following that up with a bit more batter as a cover before flipping. Unfortunately, while this method was messier, it wasn't more effective at keeping the globs from melting out.
And freezing the goo, yes. That was my game plan from the outset of this project, but as I suspected, the sugar content in the maple syrup prevented the goo from freezing. Really, there was little to no discernable difference in behavior between the room temp or refrigerated goo globs and the frozen, so I omitted that part as well.
Anyway, rest assured there'll be a round two of this experiment coming sometime soon, but I just want to put out there that both personally and as representative of Crack addicts everywhere, I think Gretchen needs to pump her brother for whatever details he may have gleaned from getting the syrup-glob-in-pancake-machine to work.
I won't tell, I promise :)
For you "enough with the foodgeek stuff" peeps, here's a peek at what went on at Modern in MN over the weekend:

That, friends, is a hack of IKEA's $8.99 TERTIAL desk lamps into wall lamps, complete with cord cover. Check out the step-by-step here.
So yea, to those of you who wondered....YES!, they're really that good, and YES!, it really is all about the syrup globs being IN the pancakes, and the here-and-there kind of blips of sweet on the tongue that makes Crack what it is, at least for me. So no, just putting syrup in some form on the pancakes doesn't cut it.
And besides, where's the fun in making something easy? :)
I'm definitely going to try the maple sugar bits, and as far as using actual maple syrup goesI've researched all your suggestions for what kind of thickener to use. As I mentioned before, being able to stay a gel when heated is the issue, and it looks like agar-agar might be the best bet...from the website cybercolloids.net:
One of the single biggest users of agar in the west is in the baking industry where the very high melting points of the agar gels make them particularly suitable to the baking process. Agar has good compatibility with sugar and can be used in very high sugar environments that would precipitate most other gums.
I also read that it's used extensively in Asia which leads me to think I may be able to buy it at the Asian market, so I'm adding it to the list for my next United Noodles run.
I should also note that in addition to the method of getting the syrup globs into the pancakes that told you about in the original post, I did in fact, try "scattering" them on top of the already cooking pancakes, and even following that up with a bit more batter as a cover before flipping. Unfortunately, while this method was messier, it wasn't more effective at keeping the globs from melting out.
And freezing the goo, yes. That was my game plan from the outset of this project, but as I suspected, the sugar content in the maple syrup prevented the goo from freezing. Really, there was little to no discernable difference in behavior between the room temp or refrigerated goo globs and the frozen, so I omitted that part as well.
Anyway, rest assured there'll be a round two of this experiment coming sometime soon, but I just want to put out there that both personally and as representative of Crack addicts everywhere, I think Gretchen needs to pump her brother for whatever details he may have gleaned from getting the syrup-glob-in-pancake-machine to work.
I won't tell, I promise :)
For you "enough with the foodgeek stuff" peeps, here's a peek at what went on at Modern in MN over the weekend:
That, friends, is a hack of IKEA's $8.99 TERTIAL desk lamps into wall lamps, complete with cord cover. Check out the step-by-step here.
Labels: cooking food mcgriddle ikea hack
Wednesday, February 04, 2009
Homemade Fast Food Fun
So, yesterday I threatened you with cooking insanity and today I am pleased to bring you that insanity...in full color.
Now, because I am food obsessed and always starving by the time I go to bed, I often spend my pre-sleep minutes thinking about what I can cook for dinner the following evening. And sometimes I consult Boy.
So yes, food is frequently our pillowtalk.
Sad but true.
Anyway.
He started out requesting breakfast for dinner, specifically pancakes, but somehow we ended up on the subject of Crack, code word for our mutually most obsessed-about fast food favorite, the sausage, egg and cheese McGriddle from McDonalds.
We sort of got hooked on them during all those early morning weekends of housebuilding, despite the fact that I did and still do think said combination of foods sounds disgusting (I seriously need to talk to the person responsible for the cheese+pancake combo). And I didn't really even like them at all at first, but somehow, it's now my chosen fast food addiction and from time to time I crave one just like...well...an addict craves crack. It's my desert island fast food item.
Anyway, being that: A. there's no McDonalds close to our house, and B. We almost never get up early enough on the weekends to make Crack last call, we pretty much never get to have Crack anymore. Which is prolly a good thing, given that they are less than nutritious and low-calorie and if you really wanna know the truth, I'm still trying to rid myself of the evidence of all those early morning Crack scores from three years ago.
But somehow the other night with Boy's help, I got it in my head that trying to replicate the sausage, egg and cheese McGridle at home would be a fun project.
And I went to sleep fantasizing about how I was going to get the little syrup blobs into the pancakes. Because that is the holy grail of the McGriddle.
Fast forward to the next day, and I've made the requisite grocery run, complete with the first package of American cheese singles I've bought since like the 80's. (They only come in a 16 pack. Anyone need some cheese singles?)
And then I come home and attack the syrup blob issue...which, considering the other elements are just basic breakfast foods, is really the only question mark in the McGriddle make-at-home challenge.
I poked around on the internet a bit, thinking someone had certainly solved this mystery already, but the best I could find was the suggestion to buy maple syrup "candies" and add them to the pancake batter. I vetoed this idea on the grounds that it seems like they'd stay hard, and what's in the McGriddle pancake is like syrup jello bits.
So I decided to try making syrup jello...with gelatin, despite my suspicions that syrup wouldn't ever really solidify when cold because of the sugar content, and knowing that anything thickened with gelatin melts when heated. And as you'll see, that's exactly what happened, but this approach did get me to the point of having syrup that was solid enough that I could at least get it into globules and into the batter.
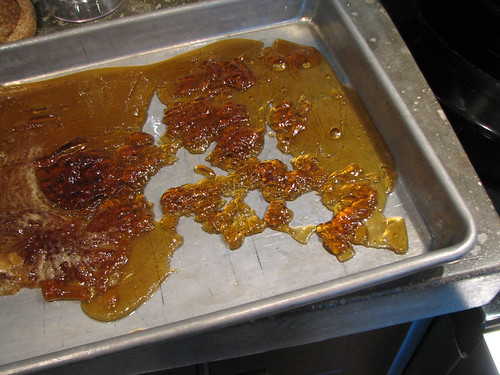
I added 1.5 packages of Knox gelatin to 1 c. of pure maple syrup, heated to disolve the gelatin and then poured into a 1/4 sheet pan well coated with cooking spray. The result I was hoping for was something firm enough (like a Knox block, remember those?) to be able to be cut into a small dice, but what I got was gloppier and sticky. It could be cut, but didn't hold it's shape enough to not stick right back together, so after trying in vain to "dice"with a knife, I ended up using a pizza cutter like a rolling food processor, running it through like crazy until it my syrup gel looked like craggy pile of goo:
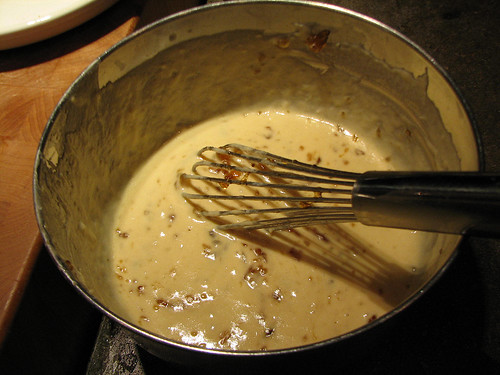
And when I put the big blobs of goo into the pancake batter and whisked, it conveniently broke back up into little blobs:
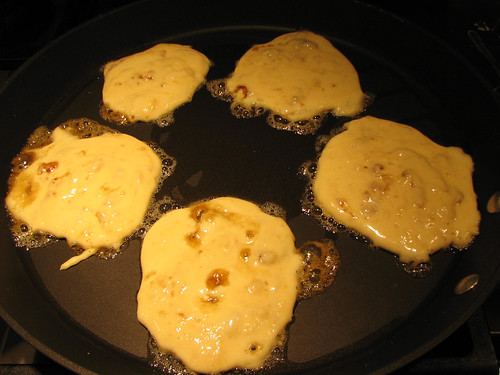
I put in about half the syrup goo blobs, so about 1/2c. of syrup to a batch of batter. I used the Joy of Cooking Buttermilk Pancake recipe, but any would work, you just want it fairly thick, ideally to yeild about a 1/2" thick pancake. I ended up cooking a off few tests and then adding a bit more flour. I was going for about a 3" diameter cake.
A nonstick griddle is a must, here, because as I predicted, the jello bits basically melt and run out once they're heated. With a bit of nugding, however, I was able to get my pancakes cooked and flipped fairly decently but I did have to stop to wash the maple syrup goo off my spatula once or twice.
Here's what they looked like:
The ingredients all ready to go:
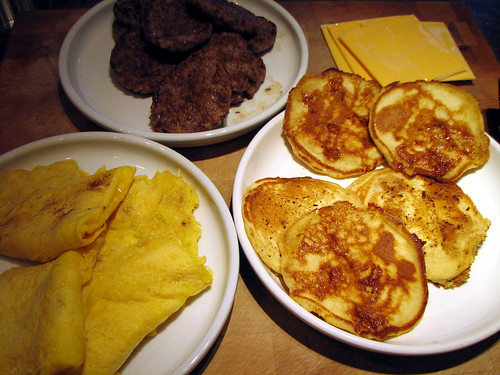
And the assembled product:
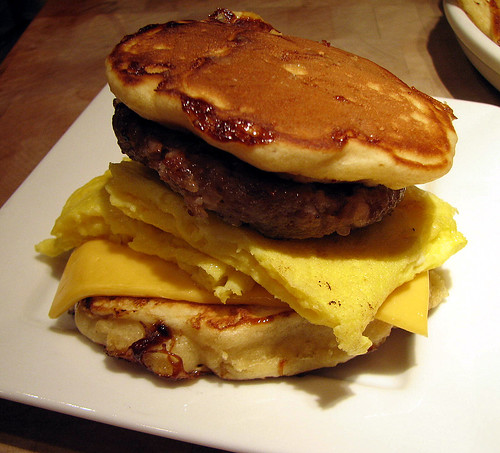
I was taking great pains to get the scrambled egg cooked in a thin layer and then folded ala the inspiration sandwich, so it was funny to find that when I went to look at the ingredient list for the actual McGriddle, it lists "folded egg". If you want them puffy and spongy like the original, whisk in a little baking powder before cooking. I used 1 egg per sandwich.
My sausage rounds ended up a little too thick and small. Basically, what you want to do is take any brand of pork breakfast sausage that comes in a tube, slice it into about 1/2" thick rounds and then flatten until they're 1/4" thick or less, and maybe 4" diameter.
I found that it worked just fine to cook off and reserve all of these individual ingredients. Once we were ready to eat, I just assembled the sandwiches without the cheese, and reheated for a few seconds in the microwave. Put the cheese on afterward, otherwise it gets infernally hot and melts completely away.
I'm calling this little adventure a win, because despite the melting syrup blob issue the pancakes still came out pretty close to the real Crack pancakes, and Boy and I both thought the final product was delicious. Plus, that it was being consumed fresh and hot at 7pm with no driving around bleary-eyed in pajamas seemed like a victory.
It won't end here though. Thanks to molecular gastronomy, there are now any number of food additives and thickeners with properties beyond that of ordinary gelatin that are avaliable to the home cook, so as soon as I figure out which one I can use that doesn't melt under heat, I'm going to get some and try again with the gelled syrup thing. My research and speculation so far points to sodium alginate or modified tapioca starch, but if you're a M.G. buff or a food scientist, please feel free to advise...
Now, because I am food obsessed and always starving by the time I go to bed, I often spend my pre-sleep minutes thinking about what I can cook for dinner the following evening. And sometimes I consult Boy.
So yes, food is frequently our pillowtalk.
Sad but true.
Anyway.
He started out requesting breakfast for dinner, specifically pancakes, but somehow we ended up on the subject of Crack, code word for our mutually most obsessed-about fast food favorite, the sausage, egg and cheese McGriddle from McDonalds.
We sort of got hooked on them during all those early morning weekends of housebuilding, despite the fact that I did and still do think said combination of foods sounds disgusting (I seriously need to talk to the person responsible for the cheese+pancake combo). And I didn't really even like them at all at first, but somehow, it's now my chosen fast food addiction and from time to time I crave one just like...well...an addict craves crack. It's my desert island fast food item.
Anyway, being that: A. there's no McDonalds close to our house, and B. We almost never get up early enough on the weekends to make Crack last call, we pretty much never get to have Crack anymore. Which is prolly a good thing, given that they are less than nutritious and low-calorie and if you really wanna know the truth, I'm still trying to rid myself of the evidence of all those early morning Crack scores from three years ago.
But somehow the other night with Boy's help, I got it in my head that trying to replicate the sausage, egg and cheese McGridle at home would be a fun project.
And I went to sleep fantasizing about how I was going to get the little syrup blobs into the pancakes. Because that is the holy grail of the McGriddle.
Fast forward to the next day, and I've made the requisite grocery run, complete with the first package of American cheese singles I've bought since like the 80's. (They only come in a 16 pack. Anyone need some cheese singles?)
And then I come home and attack the syrup blob issue...which, considering the other elements are just basic breakfast foods, is really the only question mark in the McGriddle make-at-home challenge.
I poked around on the internet a bit, thinking someone had certainly solved this mystery already, but the best I could find was the suggestion to buy maple syrup "candies" and add them to the pancake batter. I vetoed this idea on the grounds that it seems like they'd stay hard, and what's in the McGriddle pancake is like syrup jello bits.
So I decided to try making syrup jello...with gelatin, despite my suspicions that syrup wouldn't ever really solidify when cold because of the sugar content, and knowing that anything thickened with gelatin melts when heated. And as you'll see, that's exactly what happened, but this approach did get me to the point of having syrup that was solid enough that I could at least get it into globules and into the batter.
I added 1.5 packages of Knox gelatin to 1 c. of pure maple syrup, heated to disolve the gelatin and then poured into a 1/4 sheet pan well coated with cooking spray. The result I was hoping for was something firm enough (like a Knox block, remember those?) to be able to be cut into a small dice, but what I got was gloppier and sticky. It could be cut, but didn't hold it's shape enough to not stick right back together, so after trying in vain to "dice"with a knife, I ended up using a pizza cutter like a rolling food processor, running it through like crazy until it my syrup gel looked like craggy pile of goo:
And when I put the big blobs of goo into the pancake batter and whisked, it conveniently broke back up into little blobs:
I put in about half the syrup goo blobs, so about 1/2c. of syrup to a batch of batter. I used the Joy of Cooking Buttermilk Pancake recipe, but any would work, you just want it fairly thick, ideally to yeild about a 1/2" thick pancake. I ended up cooking a off few tests and then adding a bit more flour. I was going for about a 3" diameter cake.
A nonstick griddle is a must, here, because as I predicted, the jello bits basically melt and run out once they're heated. With a bit of nugding, however, I was able to get my pancakes cooked and flipped fairly decently but I did have to stop to wash the maple syrup goo off my spatula once or twice.
Here's what they looked like:
The ingredients all ready to go:
And the assembled product:
I was taking great pains to get the scrambled egg cooked in a thin layer and then folded ala the inspiration sandwich, so it was funny to find that when I went to look at the ingredient list for the actual McGriddle, it lists "folded egg". If you want them puffy and spongy like the original, whisk in a little baking powder before cooking. I used 1 egg per sandwich.
My sausage rounds ended up a little too thick and small. Basically, what you want to do is take any brand of pork breakfast sausage that comes in a tube, slice it into about 1/2" thick rounds and then flatten until they're 1/4" thick or less, and maybe 4" diameter.
I found that it worked just fine to cook off and reserve all of these individual ingredients. Once we were ready to eat, I just assembled the sandwiches without the cheese, and reheated for a few seconds in the microwave. Put the cheese on afterward, otherwise it gets infernally hot and melts completely away.
I'm calling this little adventure a win, because despite the melting syrup blob issue the pancakes still came out pretty close to the real Crack pancakes, and Boy and I both thought the final product was delicious. Plus, that it was being consumed fresh and hot at 7pm with no driving around bleary-eyed in pajamas seemed like a victory.
It won't end here though. Thanks to molecular gastronomy, there are now any number of food additives and thickeners with properties beyond that of ordinary gelatin that are avaliable to the home cook, so as soon as I figure out which one I can use that doesn't melt under heat, I'm going to get some and try again with the gelled syrup thing. My research and speculation so far points to sodium alginate or modified tapioca starch, but if you're a M.G. buff or a food scientist, please feel free to advise...
Tuesday, February 03, 2009
The Cutest, Now in Leather!
This is something I've been meaning to get around to for ages, so I'm happy to finally have a finished object to show for all those good intentions...
At long last, the Cutest Bag in leather!

I'm extremely pleased with how this came out and I can't wait to explore the possibilities for leather+ fabric and leather+leather in this style. This particular version was commisioned by Boy'sMom, and I have her to thank for providing the nudge I needed to give the ever-adorable and practical Cutest Bag pattern the necessary tweaks to be able to start offering it in leather.
I do love me some stitching detail here at S.C., and this bag offers that plus some nifty leather piping along the opening edges.
Now if I can only find time to make one for myself!
p.s. Major cooking insanity coming up...if you could eat only a single fast food item for the rest of your life, what would it be? I'll show you a home cooked version of my pick tomorrow!
At long last, the Cutest Bag in leather!
I'm extremely pleased with how this came out and I can't wait to explore the possibilities for leather+ fabric and leather+leather in this style. This particular version was commisioned by Boy'sMom, and I have her to thank for providing the nudge I needed to give the ever-adorable and practical Cutest Bag pattern the necessary tweaks to be able to start offering it in leather.
I do love me some stitching detail here at S.C., and this bag offers that plus some nifty leather piping along the opening edges.
Now if I can only find time to make one for myself!
p.s. Major cooking insanity coming up...if you could eat only a single fast food item for the rest of your life, what would it be? I'll show you a home cooked version of my pick tomorrow!
Labels: sewing leather fabric handbags
![]()