
Monday, March 07, 2011
Boule'd
You'll recall a couple of posts back when I told you about the new-ish Tartine Bread book and how much I love the technique tweak of using a cast-iron combo cooker as a baking cloche.
Well, I still love it. I've been doing about a batch a week using the Tartine formula, but I've also started using the combo cooker technique in place of a baking stone with other bread formulas wherever possible, because it just works that well. So we've been eating a lot of boule (a round shape bread, that is) vs. any of the other and less combo cooker-friendly loaf shapes. (So far, I have resisted buying the oval shaped cooker to use for batards, but I suspect it's acquisition is undeniable.)
I usually divide whatever that weeks' variation of the Tartine country loaf recipe happens to be into two or three large boules, but finally last week, a batch of grass-fed beef chili bubbling away on the stove and a batch of the Tartine bread being worked on the counter gave me an ah-ha moment and an idea that I don't know why hadn't occurred to me sooner.
Mini Boules! Perfect for recreating one of our old, back-in-the-day, before-certain-unnamed-casual-dining-restaurants-totally-skankified favorites, chili served in a bread bowl!
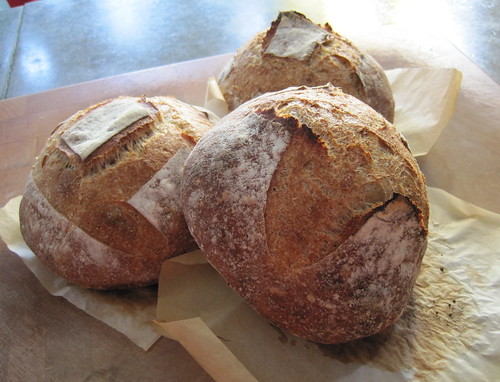
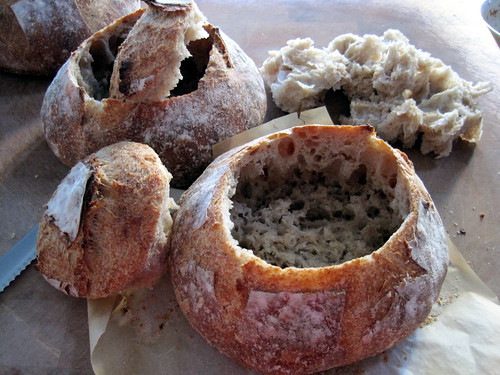
The loaves themselves came out so, so perfectly. The Tartine recipe uses one kilo of flour, and I found that makes eight mini-loaves that are just about perfectly sized for an entree soup or chili vessel. I cut a round out of the top center of the crust and then extracted some of the guts of the bread to make more room. If you can restrain yourself from eating these guts smeared with butter right then and there, you could save them for breadcrumbs for something else or just put them on the side with the plated dish. They're not pretty, but they're pretty yummy.
And finally, fill that cute little sucker up with your favorite chili or soup:
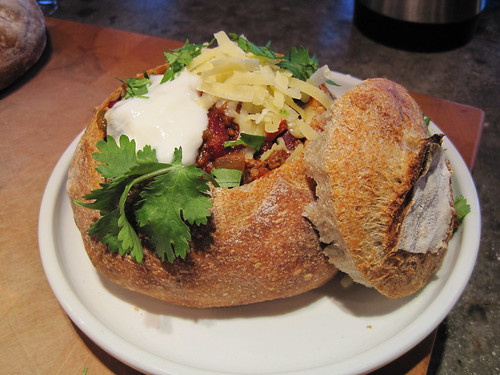
Yummy! Especially the last bits of chili-soaked, squishy, crusty bread bowl to tear apart and devour.
These worked perfectly for their intended purpose, but they're also the perfect size for two peoples' worth of bread to go with dinner. As a rule I stash my weekly bake in the freezer and I had taken to quartering a loaf before bagging it so I'd have just the right amount to serve with a meal for two. But a whole little mini-loaf is much more fun, and it survives a quick trip into the oven to re-crisp better than a portion of a larger loaf, too.
I feel a soup party coming on!
Well, I still love it. I've been doing about a batch a week using the Tartine formula, but I've also started using the combo cooker technique in place of a baking stone with other bread formulas wherever possible, because it just works that well. So we've been eating a lot of boule (a round shape bread, that is) vs. any of the other and less combo cooker-friendly loaf shapes. (So far, I have resisted buying the oval shaped cooker to use for batards, but I suspect it's acquisition is undeniable.)
I usually divide whatever that weeks' variation of the Tartine country loaf recipe happens to be into two or three large boules, but finally last week, a batch of grass-fed beef chili bubbling away on the stove and a batch of the Tartine bread being worked on the counter gave me an ah-ha moment and an idea that I don't know why hadn't occurred to me sooner.
Mini Boules! Perfect for recreating one of our old, back-in-the-day, before-certain-unnamed-casual-dining-restaurants-totally-skankified favorites, chili served in a bread bowl!
The loaves themselves came out so, so perfectly. The Tartine recipe uses one kilo of flour, and I found that makes eight mini-loaves that are just about perfectly sized for an entree soup or chili vessel. I cut a round out of the top center of the crust and then extracted some of the guts of the bread to make more room. If you can restrain yourself from eating these guts smeared with butter right then and there, you could save them for breadcrumbs for something else or just put them on the side with the plated dish. They're not pretty, but they're pretty yummy.
And finally, fill that cute little sucker up with your favorite chili or soup:
Yummy! Especially the last bits of chili-soaked, squishy, crusty bread bowl to tear apart and devour.
These worked perfectly for their intended purpose, but they're also the perfect size for two peoples' worth of bread to go with dinner. As a rule I stash my weekly bake in the freezer and I had taken to quartering a loaf before bagging it so I'd have just the right amount to serve with a meal for two. But a whole little mini-loaf is much more fun, and it survives a quick trip into the oven to re-crisp better than a portion of a larger loaf, too.
I feel a soup party coming on!
Comments:
<< Home
These are gorgeous!
But, I just want to confirm- do you have mini cast iron combo cookers that you used to make these? or did you just put smaller loaves into the larger pot, somehow...?
But, I just want to confirm- do you have mini cast iron combo cookers that you used to make these? or did you just put smaller loaves into the larger pot, somehow...?
# posted by  : 8:11 AM
: 8:11 AM
You do such cool stuff, you really should advertise your shop and blog over on younghouselove.com. They have great sponsors, and you'd fit right in. JMO, don't know how you feel about advertising, or growing your blog. I just like both of you.
# posted by : 9:42 AM
: 9:42 AM 
Hi- I am a long time reader of your blogs. Love the diversion of seeing your projects. You haven't posted in so long, I wanted to check to see if you are doing OK? I hope you are just too busy with projects to post.
-Splatfan
-Splatfan
# posted by : 9:03 PM
: 9:03 PM
When you divide the normal recipe into 8 loaves, do you still bake each loaf for 20 minutes covered then 20 minutes uncovered? Or does the smaller loaf require different bake times?
Thanks,
Chris
Thanks,
Chris
# posted by : 9:41 PM
: 9:41 PM
Hi Chris--
I'd still do 15-20 minutes covered. After that just keep an eye on them until you get a nice dark brown. Overall you should still end up fairly close to the same 40-ish minutes total bake time at 450F.
You can also try the internal temp method which would be ~206F when done, minus a degree or two depending on your personal preference for crust color.
Post a Comment
I'd still do 15-20 minutes covered. After that just keep an eye on them until you get a nice dark brown. Overall you should still end up fairly close to the same 40-ish minutes total bake time at 450F.
You can also try the internal temp method which would be ~206F when done, minus a degree or two depending on your personal preference for crust color.
<< Home
![]()